
The burin
- Marco Poma
- Mar 9
- 7 min read
Updated: Mar 11
The images shown and the knowledge acquired are credited to the burin engraving seminars conducted by Professor Riccardo Bucella, currently an external lecturer at the Il Bisonte Foundation.

DESCRIPTION
The burin is a tempered steel blade with a quadrangular cross-section, featuring one end tapered for insertion into the wooden handle and the other cut at an oblique angle with a variable inclination, usually around 45°. Some burins have a blade curved toward the handle to facilitate use.
The burin's handle is made of wood and generally has a half-mushroom shape, allowing it to fit comfortably in the palm.
A burin is distinguished by the shape of its cross-section, which can be square, lozenge (diamond-shaped), ogival, rigatino (multi-line), flat, or onglette.

The size of the blade is indicated by a number engraved on it, starting from 1 for the smallest and increasing accordingly.
A medium-sized blade is recommended for beginners, as a smaller blade has a higher risk of bending under hand pressure.
This tool gives its name to the technique and is considered the forerunner of intaglio printmaking par excellence. Originally, it was used by goldsmiths to engrave utensils through the niello technique, an amalgam of sulfur, silver, and lead used to darken engraved marks.
Its artistic practice remained secondary to its role as a means of technical reproduction—at least until the advent of photography, which eventually replaced it for this purpose. The precision and elegance of burin engraving, combined with the craftsmanship of artisans and artists, allowed for the full graphic translation of the most famous sculptural and pictorial masterpieces. This made the technique the primary medium for cultural dissemination in its historical period.
Its distinctive feature is the mark it produces—clean and precise. It is maneuvered with a steady and controlled technique, resulting in a line that is less gestural and highly technical.
Mastering this tool requires a great deal of practice. The guidelines provided in this blog will be useful for getting started, but patience and perseverance will be essential to progress further.
PLATE PREPARATION
- Copper plate

- Emery paper (800/1000 grit)
- 4 screws
- Wooden board (larger than the plate)
The best support for starting with the burin is a copper plate, chosen for its ductility.
It is recommended to lightly sand the plate with 800/1000 grit emery paper to clean the surface from oxidation and, more importantly, to matte the surface, reducing reflections that could strain the eyes during the engraving process.

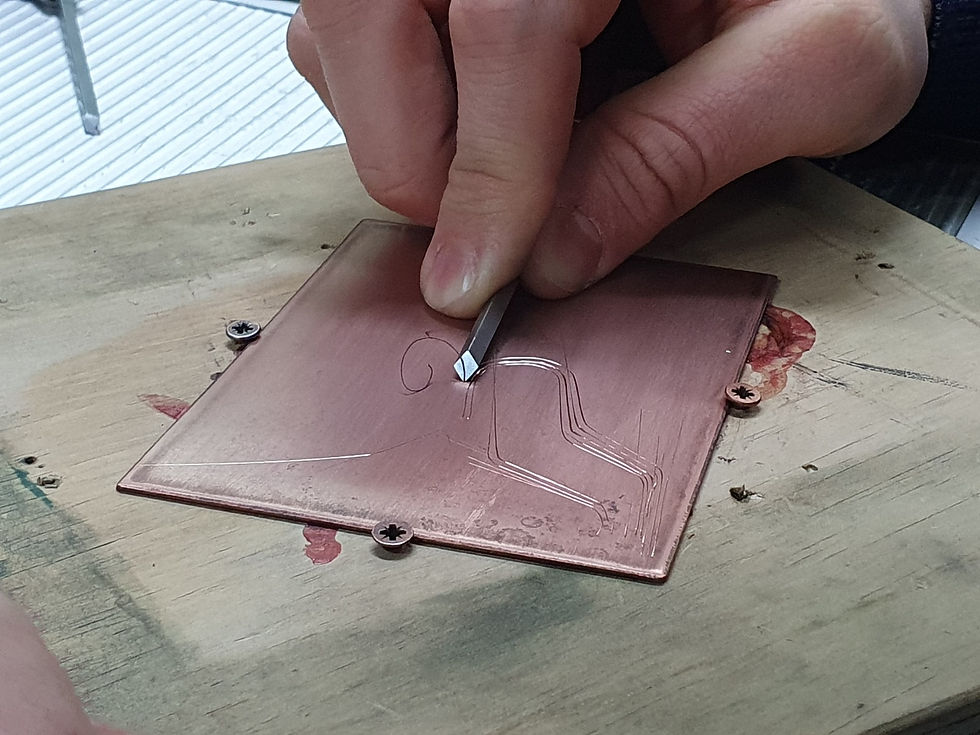
An efficient method for easily maneuvering the plate is to secure it with screws onto a wooden board. This provides a firm grip, keeping the plate stable while allowing it to be rotated as needed.
If screws are used for fastening, it is preferable to bevel the plate after the engraving process to remove any marks left on the edges by the screws.
MOUNTING A BURIN
- Bench vise
- Masking tape
- Blowtorch
- Pliers
- Water grinding wheel
- General-purpose glue
- Hammer

Burin tools are not always sold pre-assembled in stores; some are available with the blade and handle sold separately. For those who wish to assemble their own, this section outlines the necessary steps.
The blade is usually longer than needed. To shorten it, secure it in a bench vise, leaving the portion to be removed exposed (the part that will be inserted into the handle). Wrap the part of the blade held in the vise with masking tape to prevent marks from the vise’s grip. Once it is firmly secured, strike it with a hammer, alternating from one side to the other, until the blade's fibers break, creating a clean cut.
Once the desired length is reached, the blade is bent to improve handling. An optimal inclination is 30° toward the handle, as this enhances the maneuverability of the burin during engraving.

To bend the blade, secure it in the vise, positioning it in the direction of the handle for shaping. The curve should be made approximately 2 cm from the end. Use a portable blowtorch to heat the blade until it reaches a bright red color, then stop heating and use pliers to bend it to the desired angle. The bend should be made in the opposite direction to the burin’s tip.
To insert the blade into the handle, it is helpful to grind the end using a water grinding wheel, making it easier to fit into the handle. If the handle is not pre-shaped, it can also be sanded using the grinding wheel.
Once the blade is prepared, secure it again in the vise and push the handle onto the blade, using a hammer for assistance. Apply glue inside the handle’s slot to help secure the blade once it dries.

SHARPENING A BURIN
- Sharpening stone (Arkansas, India, or similar) with two different grits, one coarse and one fine
- Oil
- Emery paper 800/1000 grit
- Crocker sharpener (recommended)
- Water grinding wheel (optional)
The burin technique relies heavily on the condition of the tool. If the blade is not well-maintained, it becomes difficult to control the engraving process, making the work frustrating and nearly impossible.
It is essential to ensure that the blade remains sharp at all times. This can be easily tested by resting the tip on a fingernail—if it grips, it is sharp; if it slides off, it needs sharpening. Alternatively, test it on a scrap plate.
There are different methods for sharpening a burin:

Manual sharpening – Place the blade’s section on the sharpening stone, starting with the coarse grit and then moving to the fine grit. Use oil to facilitate friction. The movement should be circular, and it is crucial to maintain a consistent angle once chosen. A light sharpening is also applied to the two cheeks (the lateral sections of the blade) to remove any burrs. Finally, the polishing is completed with very fine emery paper.

Crocker - This tool is specifically designed for sharpening the burin. It is adjustable for inclination, rotation, and blade extension. It features a smooth support surface that allows the burin to glide easily over the sharpening stone.
The Crocker sharpener is highly recommended because, once the angle of the blade section is set, it remains constant throughout the sharpening process, ensuring precision and consistency.

Water Grinding Wheel - This is the fastest method for sharpening the burin. It can be used in combination with the Crocker sharpener by resting it on the flat side of the rotating stone and placing the burin’s section against it.
After sharpening, any burrs that form on the cheeks of the tool should be removed using fine sandpaper.
Once the burin has been sharpened, it is recommended to test it on a scrap plate to check its functionality.
METHOD OF USE
- Leather cushion filled with sand / a coin
- Scraper-burnisher
- Soft brush
- Sandpaper
- Concentration
- Desk lamp
- Magnifying glass (optional)
- Black intaglio ink

GRIP
The burin is held with the preferred hand, with the thumb and index finger resting on the blade for stability. The middle, ring, and little fingers rest on the indentation of the handle, pressing it against the palm. This hand is also responsible for adjusting the blade's angle.
The shoulder and hand apply the necessary pressure to push the burin against the plate, while the other hand counteracts the force to keep the plate steady and rotate it when needed for curved lines.
To make it easier to rotate the plate, a leather cushion filled with sand can be used, or more simply, a coin can be glued under the plate to allow smooth movement.
The hand controlling the plate or its support should never be directly in line with the burin. At most, the palm can be lifted while keeping the fingers resting, preventing injury in case the blade slips off the engraving path.
ENGRAVING
Begin by positioning the tip of the burin against the plate. Once it is "anchored," lower the angle close to the surface to allow smooth movement. Finding the ideal angle takes practice - if it is too steep, the burin will get stuck; if too low, it will slip out of the engraving path.
The burin works like a plow, creating a clean incision on the surface. The end of the stroke has a characteristic tapered closure, caused by the tip lifting out of the triangular-shaped groove. Each engraved line produces a metal shaving, which must be removed using a scraper-burnisher, a soft brush, or fine emery paper, as these shavings are very sharp and can easily pierce the skin like splinters.
It is recommended to warm up your hand on a test plate to find a steady rhythm. Concentration is essential, as a mistakenly engraved line can permanently affect the composition. While it is possible to try to remove the mark with a scraper, engraving - like subtractive sculpture - does not allow for undoing mistakes.
Good lighting is crucial for observing the engraved lines. The light should be frontal with no shadows between the burin and the plate. A useful tip is to soften the light using a desk lamp covered with white tissue paper to create a diffuse glow.
A magnifying glass can also greatly improve visibility. Burin engraving is a technique that requires close observation, and using a magnifier can prevent excessive bending over the plate.
To check progress during engraving, lightly rub a bit of black intaglio ink onto the plate to highlight the engraved lines - a trick derived from the niello technique.
POSTURE
Burin engraving is a slow, meditative process that requires sustained concentration. The long working hours demand proper posture to avoid strain or injury.
The ideal position is to keep the plate at shoulder height, reducing the need to hunch over. Use risers on the table to find the most comfortable position, and always remember to take breaks. As mentioned before, burin engraving is not about speed but precision.
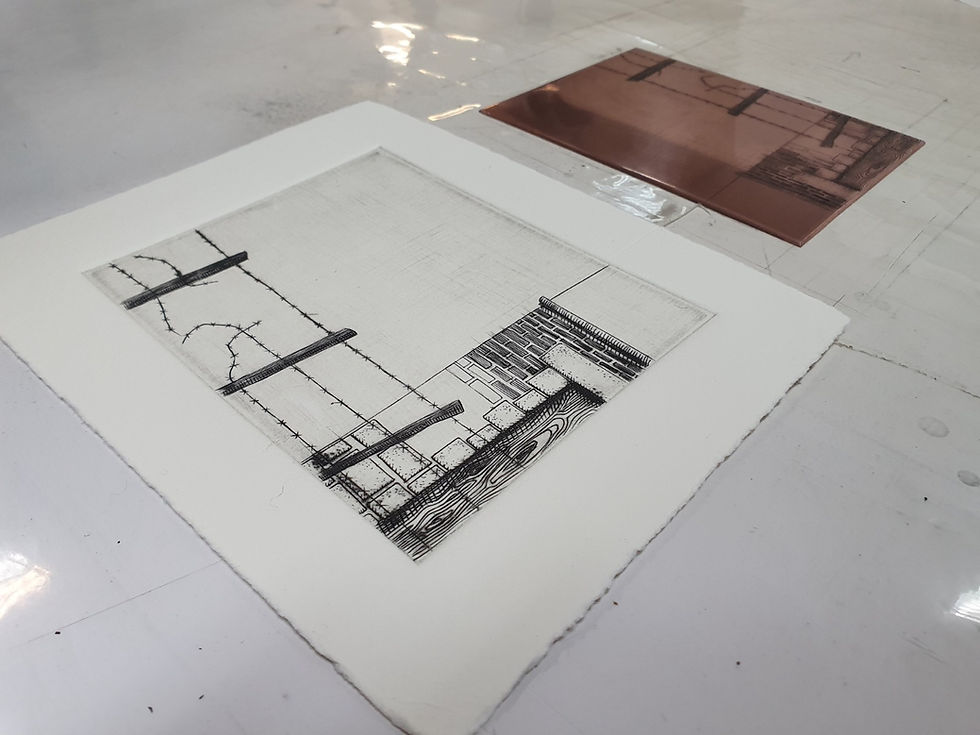
PRINTING
Once the engraving of the plate is complete, the printing process begins. Before inking, it is advisable to pass fine-grit sandpaper over the surface to remove any copper burrs.
The ink should have low viscosity, which can be thickened using magnesium powder.
The inking process involves applying the ink with a rubber spatula, removing the excess with tarlatan, and finalizing the cleaning with tissue paper. Before printing, wipe the edges with a clean cloth.


Contemporary burin artists:
- Jürgen Czaschka (End-grain wood, copper)
- Riccardo Bucella (Copper)
- Gianluca Murasecchi (Copper)
- Guido Navaretti (Plexiglass)
- Lanfranco Quadrio (Copper)
- Gianfranco Schialvino (End-grain wood)
- Reinis Gailitis (Copper)
- Takuji kubo (Copper)
- Takehiro Nikai (End-grain wood)
- Hatayama Ayataro (Copper)
- Koichi Yamamoto (Copper)


Comments