
Hand-bound folder for prints and drawings
- Marco Poma
- Mar 13
- 5 min read
This section is dedicated to the creation of a 50x35 cm hand-bound folder for storing prints and drawings. The seminar from which the images and shared knowledge are taken is held at the Il Bisonte Foundation by bookbinding teacher Stefano Spilli.

PREPARATION OF VEGETABLE GLUE
- 00 flour
- Cloves
- Water
- Whisk
- Vinavil NPC Stella Bianca glue

For the creation of this folder, a vegetable glue mixed with Vinavil glue is used. The advantage of vegetable glue lies in its affordability, as it is made from simple ingredients. Its drying time is slower compared to Vinavil, allowing more time to work with the materials where it is applied and making it easier to adjust the adhesion in case of mistakes. However, vegetable glue dries too slowly for projects requiring speed and, once dry, is weaker than its industrial counterpart. For this reason, it is recommended to mix vegetable glue with Vinavil in a 1:1 ratio, eliminating the disadvantages while combining the benefits of both.
The glue is made using 00 flour in a 1:5 ratio with water. In the seminar, 100 g of flour is used for half a liter of water.
Bring the water to a boil along with 8 to 10 cloves. Cloves act as a preservative, preventing mold formation in the vegetable glue. Once the water has cooled, gradually add it to the flour in a small pot, stirring with a whisk to avoid lumps. After incorporating all the water, cook the mixture until it boils, stirring continuously until it thickens to a cream-like consistency. Remove from heat, let it cool, and store it in the refrigerator.


Once the vegetable glue is prepared, it is gradually mixed with Vinavil, using a whisk to prevent lumps. If lumps persist, they can be strained using a sieve.
The ratio is 1:1.
If the glue is too thick, water can be added to facilitate application with a brush.
FOLDER PREPARATION
- 3 mm smooth gray cardboard
- Black SKY Balacron faux leather
- Black Imperial fabric
- Fedrigoni Arcoprint ivory paper, 225 g
- Black herringbone ribbon
- Natural bristle brush
- Scissors
- Chisel
- Hammer
- Clean cotton cloths
- Newspaper
- Bone folder

1. Begin by cutting two 50x36 cm pieces from a 3 mm smooth gray cardboard. The long side of the folder should be parallel to the fiber direction of the cardboard, as it tends to warp when glue is applied. Aligning the fibers correctly helps minimize this effect.
For the covering, different materials are used: • Black SKY Balacron faux leather for the external covering of the cardboard. Easy to clean, moisture-resistant, and smooth to the touch. -Two pieces of 50x36 cm

• Black Imperial fabric for the external corners and the spine (both interior and exterior). Enhances the folder's look and provides more flexibility on the spine. Not stain-resistant, so always handle with clean hands. - One piece of 49x10.5 cm for the interior. - One piece of 54x16.5 cm for the exterior. - Two pieces of 11.5x11.5 cm, to be cut diagonally at the moment of application on the corners.

• Fedrigoni Arcoprint Ivory 225 g Laid Paper for the inner lining of the folder.
A neutral color is recommended so that it does not clash with the colors of the transported artworks. The sturdiness of the paper is essential to prevent tears or creases when applying glue and placing it on the cardboard. - Two sheets of 49x32 cm

• Black herringbone ribbon for creating the folder's closure ties.
The ribbon has a width of 1.5 cm and features a herringbone weave, adding an elegant touch to the folder. - Six pieces, each 30 cm long, to be applied along the central edge of each side of the cardboard, excluding the spine side.
2. The back of the fabric piece for the outer spine is glued using a natural bristle brush.
A general rule for gluing fabric is to spread the glue from the inside outward to prevent staining the surface.
The cardboards are placed on the glued spine fabric, aligning them 7.5 cm from the edges. To ensure precision, it is helpful to mark guide lines with a pencil on the fabric for positioning. Firm hand pressure is applied to adhere the fabric to the cardboard. Then, the folder is turned over, and a clean cotton cloth is used to press down, eliminating any air bubbles.
Once the cardboards are secured, the fabric edges are folded inward, pressing firmly with the fingers until the glue takes hold. A bone folder is a useful tool for applying pressure, especially to ensure the fabric adheres well around the corners and grooves.


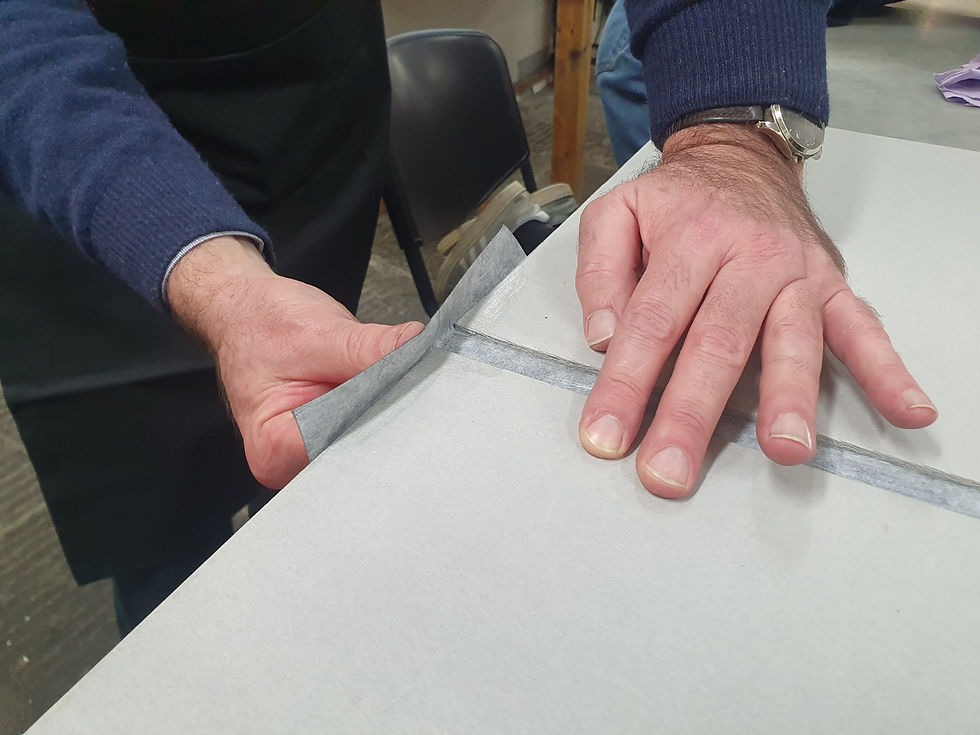


3.The inner fabric of the folder is then glued. It can be centered by eye or by marking the correct position with a pencil on the cardboard to facilitate the process. The fabric is placed and lightly pressed by hand to secure its position, followed by pressing with a cloth to ensure adhesion. A bone folder is used to firmly adhere the fabric along the grooves of the cardboard.
Once these two steps are completed, the structure of the folder is finished, and the process can continue with covering the outer corners.


4. Take the two squares of fabric measuring 11.5 x 11.5 cm and cut them in half diagonally. Apply glue to each resulting triangle, placing it on the external corners of each cardboard piece while leaving a 1.5 cm overhang along the edges.
Cut off the excess fabric at the corner with scissors, taking care to leave a few millimeters to cover the thickness of the cardboard. Then, fold the ends inward over the cardboard; start with one side and, using your fingernail, fold the fabric along the edge so that it overlaps itself, and then proceed with the other side. If done correctly, the fabric will perfectly cover the corner of the cardboard without overlapping.


5. Before proceeding with the faux leather covering, mark its position with a pencil. It should overlap the fabric by approximately 5 mm. Once measured, fold and then cut the corners, excluding the edges that will go on the spine.
Glue the two pieces of faux leather onto the cardboards, then fold the excess edges inward to secure them inside the folder.


6. To insert the ribbons, mark the center of the three outer sides of the cardboards with a pencil, keeping a 1.5 cm distance from the edge. Use a hammer and chisel to carve a slit as wide as the ribbon. It is important to do this on the side covered with Balacron.
Insert the 30 cm ribbons, using a flat tool to push them inside.
Glue the ribbon with Vinavil on the inner side of the cardboard, securing 2 to 3 cm of its length inside.


7. For the endpapers, 220 g ivory laid Fedrigoni paper is used. Cut two pieces measuring 49x32 cm, apply glue, and position them evenly along the three outer edges of the cardboards.
Press down with a cotton cloth, starting from the center and quickly working on areas where air bubbles form.


8. Once the folder is completed, place it under pressure to allow the glue to dry and prevent the cardboards from warping.


Comments